ZHCSHD5A January 2018 – October 2018 ADS112U04
PRODUCTION DATA.
- 1 特性
- 2 应用
- 3 说明
- 4 修订历史记录
- 5 Pin Configuration and Functions
- 6 Specifications
- 7 Parameter Measurement Information
-
8 Detailed Description
- 8.1 Overview
- 8.2 Functional Block Diagram
- 8.3
Feature Description
- 8.3.1 Multiplexer
- 8.3.2 Low-Noise Programmable Gain Stage
- 8.3.3 Voltage Reference
- 8.3.4 Modulator and Internal Oscillator
- 8.3.5 Digital Filter
- 8.3.6 Conversion Times
- 8.3.7 Excitation Current Sources
- 8.3.8 Sensor Detection
- 8.3.9 System Monitor
- 8.3.10 Temperature Sensor
- 8.3.11 Offset Calibration
- 8.3.12 Conversion Data Counter
- 8.3.13 Data Integrity
- 8.3.14 General-Purpose Digital Inputs/Outputs
- 8.4 Device Functional Modes
- 8.5 Programming
- 8.6
Register Map
- 8.6.1 Configuration Registers
- 8.6.2
Register Descriptions
- 8.6.2.1 Configuration Register 0 (address = 00h) [reset = 00h]
- 8.6.2.2 Configuration Register 1 (address = 01h) [reset = 00h]
- 8.6.2.3 Configuration Register 2 (address = 02h) [reset = 00h]
- 8.6.2.4 Configuration Register 3 (address = 03h) [reset = 00h]
- 8.6.2.5 Configuration Register 4 (address = 04h) [reset = 00h]
- 9 Application and Implementation
- 10Power Supply Recommendations
- 11Layout
- 12器件和文档支持
- 13机械、封装和可订购信息
封装选项
机械数据 (封装 | 引脚)
散热焊盘机械数据 (封装 | 引脚)
- RTE|16
订购信息
9.2.2.3 Application Curves
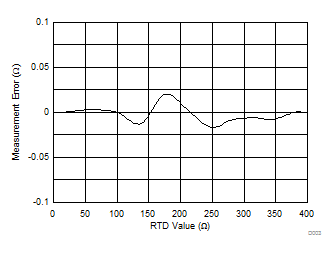
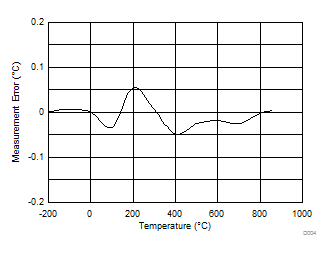
Figure 82 and Figure 83 show the measurement results. The measurements are taken at TA = 25°C. A system offset calibration is performed using a reference resistor of 100 Ω. No gain calibration is implemented. The data in Figure 82 are taken using precision resistors instead of a 3-wire Pt100. The respective temperature measurement error in Figure 83 is calculated from the data in Figure 82 using the NIST tables.
The design meets the required temperature measurement accuracy given in Table 26. However, the measurement error shown in Figure 83 does not include the error of the RTD itself.

