ZHCSDM7B February 2012 – December 2014 LMP8646
PRODUCTION DATA.
- 1 特性
- 2 应用
- 3 说明
- 4 修订历史记录
- 5 Pin Configuration and Functions
- 6 Specifications
- 7 Detailed Description
- 8 Application and Implementation
- 9 Power Supply Recommendations
- 10Layout
- 11器件和文档支持
- 12机械、封装和可订购信息
8 Application and Implementation
NOTE
Information in the following applications sections is not part of the TI component specification, and TI does not warrant its accuracy or completeness. TI’s customers are responsible for determining suitability of components for their purposes. Customers should validate and test their design implementation to confirm system functionality.
8.1 Application Information
The LMP8646 can be driven by many different regulators with a feedback pin and connected to many different types of loads such as capacititve and resistive. The following sections gives three typical applications of the LMP8646.
8.2 Typical Applications
8.2.1 Application #1: Current Limiter With a Capacitive Load
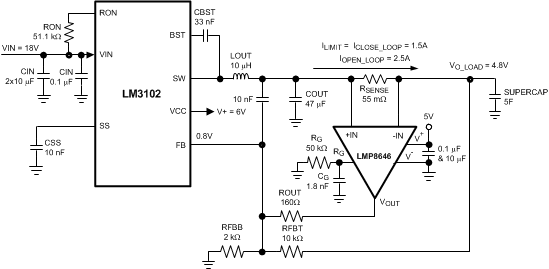 Figure 28. SuperCap Application With LM3102 Regulator
8.2.1.1 Design Requirements
A supercap application requires a very high capacitive load to be charged. This example assumes the output capacitor is 5F with a limited sense current at 1.5A. The LM3102 will provide the current to charge the supercap, and the LMP8646 will monitor this current to make sure it does not exceed the desired 1.5A value.
8.2.1.2 Detailed Design Procedure
To limit the capacitor current, first connect the LMP8646 output to the feedback pin of the LM3102, as shown in Figure 28. This feedback voltage at the FB pin is compared to a 0.8V internal reference. Any voltage above this 0.8V means the output current is above the desired value of 1.5A, and the LM3102 will reduce its output current to maintain the desired 0.8V at the FB pin.
The following steps show the design procedures for this supercap application. In summary, the steps consist of selecting the components for the voltage regulator, integrating the LMP8646 and selecting the proper values for its gain, bandwidth, and output resistor, and adjusting these components to yield the desired performance.
Step 1: Choose the components for the Regulator.
Refer to the LM3102 evaluation board application note (AN-1646) to select the appropriate components for the LM3102 voltage regulator.
Step 2: Choose the sense resistor, RSENSE
RSENSE sets the voltage VSENSE between +IN and -IN and has the following equation:
In general, RSENSE depends on the output voltage, limit current, and gain. Refer to section Selection of the Sense Resistor, RSENSE to choose the appropriate RSENSE value; this example uses 55 mOhm.
Step 3: Choose the gain resistor, RG, for LMP8646
RG is chosen from the limited sense current. As stated, VOUT = (RSENSE * ILIMIT) * (RG / 5kOhm). Since VOUT = VFB = 0.8V, the limited sense current is 1.5A, and RSENSE is 55 mOhm, RG can be calculated as:
Step 4: Choose the Bandwidth Capacitance, CG.
The product of CG and RG determines the bandwidth for the LMP8646. Refer to the Typical Performance Characteristics plots to see the range for the LMP8646 bandwidth and gain. Since each application is very unique, the LMP8646 bandwidth capacitance, CG, needs to be adjusted to fit the appropriate application.
Bench data has been collected for the supercap application with the LM3102 regulator, and we found that this application works best for a bandwidth of 500 Hz to 3 kHz. Operating outside of this recommended bandwidth range might create an undesirable load current ringing. We recommend choosing a bandwidth that is in the middle of this range and using the equation CG = 1/(2*pi*RG*Bandwidth) to find CG. For example, if the bandwidth is 1.75 kHz and RG is 50 kOhm, then CG is approximately 1.8 nF. After this selection, capture the plot for lLIMIT and adjust CG until a desired load current plot is obtained.
Step 5: Calculate the Output Accuracy and Tolerable System Error
Since the LMP8646 is a precision current limiter, the output current accuracy is extremely important. This accuracy is affected by the system error contributed by the LMP8646 device error and other errors contributed by external resistances, such as RSENSE and RG.
In this application, VSENSE = ILIMIT * RSENSE = 1.5A * 55 mOhm = 0.0825V, and RG = 50 kOhm. From the Electrical Characteristics Table, it is known that VOFFSET = 1 mV and Gm_Accuracy = 2%. Using the equations shown in Equation 8, the output accuracy can be calculated as 3.24%.
After figuring out the LMP8646 output accuracy, choose a tolerable system error or the output current accuracy that is bigger than the LMP8646 output accuracy. This tolerable system error will be labeled as IERROR, and it has the equation IERROR = (IMAX - ILIMIT)/IMAX (%). In this example, we will choose an IERROR of 5%, which will be used to calculate for ROUT shown in the next step.
Step 6: Choose the output resistor, ROUT
At start-up, the capacitor is not charged yet and thus the output voltage of the LM3102 is very small. Therefore, at start-up, the output current is at its maximum (IMAX). When the output voltage is at its nominal, then the output current will settle to the desired limited value. Because a large current error is not desired, ROUT needs to be chosen to stabilize the loop with minimal initial start-up current error. Follow the equations and example below to choose the appropriate value for ROUT to minimize this initial error.
As discussed in step 4, the allowable IERROR is 5%, where IERROR = (IMAX - ILIMIT)/IMAX (%). Therefore, the maximum allowable current is calculated as: IMAX = ILIMIT (1+ IERROR) = 1.5A * (1 + 5/100) = 1.575 A.
Next, use Equation 14 below to calculate for ROUT:

For example, assume the minimum LM3102 output voltage, VO_REG_MIN, is 0.6V, then ROUT can be calculated as ROUT = [1.575A * 55 mOhm * (49.9k / 5k) - 0.8] / [ (0.8 / 2k) - (0.6 - 0.8) / 10k] = 153.6 Ohm.
Populate ROUT with a resistor that is as close as possible to 153.6 Ohm (this application uses 160 Ohm). If the limited sense current has a gain error and is not 1.5A at any point in time, then adjust this ROUT value to obtain the desired limit current.
We recommend that the value for ROUT is at least 50 Ohm.
Step 7: Adjusting Components
Capture the output current and output voltage plots and adjust the components as necessary. The most common components to adjust are CG to decrease the current ripple and ROUT to get a low current error. An example output current and voltage plot can be seen in Figure 29.
8.2.1.3 Application Curve
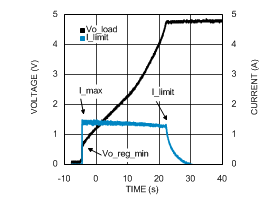 Figure 29. SuperCap Application With LM3102 Regulator Plot
8.2.2 Application #2: Current Limiter With a Resistive Load
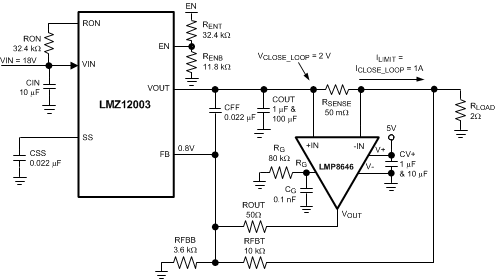 Figure 30. Resistive Load Application With LMZ12003 Regulator
8.2.2.1 Design Requirements
This subsection describes the design process for a resistive load application with the LMZ12003 voltage regulator as seen in Figure 30. To see the current limiting capability of the LMP8646, the open-loop current must be greater than the close-loop current. An open-loop occurs when the LMP8646 output is not connected the LMZ12003’s feedback pin. For this example, we will let the open-loop current to be 1.5A and the close-loop current, ILIMIT, to be 1A.
8.2.2.2 Detailed Design Procedure
Step 1: Choose the components for the Regulator.
Refer to the LMZ12003 application note (AN-2031) to select the appropriate components for the LMZ12003.
Step 2: Choose the sense resistor, RSENSE
RSENSE sets the voltage VSENSE between +IN and -IN and has the following equation:
In general, RSENSE depends on the output voltage, limit current, and gain. Refer to section Selection of the Sense Resistor, RSENSE to choose the appropriate RSENSE value; this example uses 50 mOhm.
Step 3: Choose the gain resistor, RG, for LMP8646
RG is chosen from ILIMIT. As stated, VOUT = (RSENSE * ILIMIT) * (RG / 5kOhm). Since VOUT = VFB = 0.8V, ILIMIT = 1A, and RSENSE = 50 mOhm , RG can be calculated as:
Step 4: Choose the Bandwidth Capacitance, CG.
The product of CG and RG determines the bandwidth for the LMP8646. Refer to the Typical Performance Characteristics plots to see the range for the LMP8646 bandwidth and gain. Since each application is very unique, the LMP8646 bandwidth capacitance, CG, needs to be adjusted to fit the appropriate application.
Bench data has been collected for this resistive load application with the LMZ12003 regulator, and we found that this application works best for a bandwidth of 2 kHz to 30 kHz. Operating anything less than this recommended bandwidth might prevent the LMP8646 from quickly limiting the current. We recommend choosing a bandwidth that is in the middle of this range and using the equation: CG = 1/(2*pi*RG*Bandwidth) to find CG (this example uses a CG value of 0.1nF). After this selection, capture the load current plot and adjust CG until a desired output current plot is obtained.
Step 5: Choose the output resistor, ROUT, for the LMP8646
ROUT plays a very small role in the overall system performance for the resistive load application. ROUT was important in the supercap application because it affects the initial current error. Because current is directly proportional to voltage for a resistive load, the output current is not large at start-up. The bigger the ROUT, the longer it takes for the output voltage to reach its final value. We recommend that the value for ROUT is at least 50 Ohm, which is the chosen value for this example.
Step 6: Adjusting Components
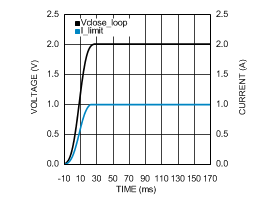
Capture the output current and output voltage plots and adjust the components as necessary. The most common component to adjust is CG for the bandwidth. An example of the output current and voltage plot can be seen in Figure 31.
8.2.2.3 Application Curve
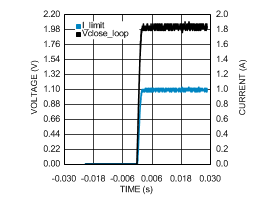 Figure 31. Plot for the Resistive Load Application With LMZ12003 Regulator Plot
8.2.3 Application #3: Current Limiter With a Low-Dropout Regulator and Resistive Load
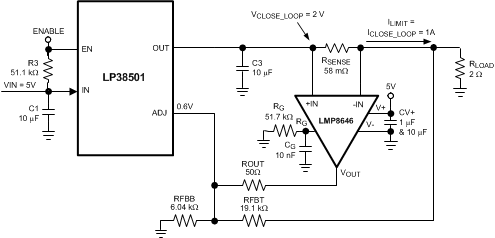 Figure 32. Resistive Load Application With LP38501 Regulator
8.2.3.1 Design Requirements
This next example is the same as the last example, except that the regulator is now a low-dropout regulator, the LP38501, as seen in Figure 32. For this example, we will let the open-loop current to be 1.25A and the close-loop current, ILIMIT, to be 1A.
8.2.3.2 Detailed Design Procedure
Step 1: Choose the components for the Regulator.
Refer to the LP38501 application note (AN-1830) to select the appropriate components for the LP38501.
Step 2: Choose the sense resistor, RSENSE
RSENSE sets the voltage VSENSE between +IN and -IN and has the following equation:
In general, RSENSE depends on the output voltage, limit current, and gain. Refer to section Selection of the Sense Resistor, RSENSE to choose the appropriate RSENSE value; this example uses 58 mOhm.
Step 3: Choose the gain resistor, RG, for LMP8646
RG is chosen from ILIMIT. As stated, VOUT = (RSENSE * ILIMIT) * (RG / 5kOhm). Since VOUT = ADJ = 0.6V, ILIMIT = 1A, and RSENSE = 58 mOhm , RG can be calculated as:
Step 4: Choose the Bandwidth Capacitance, CG.
The product of CG and RG determines the bandwidth for the LMP8646. Refer to the Typical Performance Characteristics plots to see the range for the LMP8646 bandwidth and gain. Since each application is very unique, the LMP8646 bandwidth capacitance, CG, needs to be adjusted to fit the appropriate application.
Bench data has been collected for this resistive load application with the LP38501 regulator, and we found that this application works best for a bandwidth of 50 Hz to 300 Hz. Operating anything larger than this recommended bandwidth might prevent the LMP8646 from quickly limiting the current. We recommend choosing a bandwidth that is in the middle of this range and using the equation: CG = 1/(2*pi*RG*Bandwidth) to find CG (this example uses a CG value of 10 nF). After this selection, capture the plot for ISENSE and adjust CG until a desired sense current plot is obtained.
Step 5: Choose the output resistor, ROUT, for the LMP8646
ROUT plays a very small role in the overall system performance for the resistive load application. ROUT was important in the supercap application because it affects the initial current error. Because current is directly proportional to voltage for a resistive load, the output current is not large at start-up. The bigger the ROUT, the longer it takes for the output voltage to reach its final value. We recommend that the value for ROUT is at least 50 Ohm, which is the value we used for this example.
Step 6: Adjusting Components
Capture the output current and output voltage plots and adjust the components as necessary. The most common component to adjust is CG for the bandwidth. An example plot of the output current and voltage can be seen in Figure 33.
