SLVS737A February   2007  – July 2015 TPS62410

PRODUCTION DATA.  

  1. Features
  2. Applications
  3. Description
  4. Revision History
  5. Pin Configuration and Functions
  6. Specifications
    1. 6.1 Absolute Maximum Ratings
    2. 6.2 ESD Ratings
    3. 6.3 Recommended Operating Conditions
    4. 6.4 Thermal Information
    5. 6.5 Electrical Characteristics
    6. 6.6 Dissipation Ratings
    7. 6.7 Typical Characteristics
  7. Detailed Description
    1. 7.1 Overview
      1. 7.1.1 Operation
        1. 7.1.1.1 Converter 1
        2. 7.1.1.2 Converter 2
    2. 7.2 Functional Block Diagram
    3. 7.3 Feature Description
      1. 7.3.1 Dynamic Voltage Positioning
      2. 7.3.2 Undervoltage Lockout
      3. 7.3.3 Mode Selection
      4. 7.3.4 Enable
      5. 7.3.5 DEF_1 Pin Function
      6. 7.3.6 180° Out of Phase Operation
      7. 7.3.7 Thermal Shutdown
    4. 7.4 Device Functional Modes
      1. 7.4.1 Soft Start
      2. 7.4.2 100% Duty Cycle Low Dropout Operation
      3. 7.4.3 Power-Save Mode
      4. 7.4.4 Short Circuit Protection
    5. 7.5 Programming
      1. 7.5.1 EasyScale™ Interface: One-Pin Serial Interface for Dynamic Output Voltage Adjustment
        1. 7.5.1.1 General
        2. 7.5.1.2 Protocol
        3. 7.5.1.3 Bit Decoding
        4. 7.5.1.4 Acknowledge
        5. 7.5.1.5 MODE Selection
    6. 7.6 Register Maps
  8. Application and Implementation
    1. 8.1 Application Information
      1. 8.1.1 Output Voltage Setting
        1. 8.1.1.1 Converter 1 Adjustable Default Output Voltage Setting
        2. 8.1.1.2 Converter 2
    2. 8.2 Typical Application
      1. 8.2.1 Design Requirements
      2. 8.2.2 Detailed Design Procedure
        1. 8.2.2.1 Output Filter Design (Inductor and Output Capacitor)
          1. 8.2.2.1.1 Inductor Selection
          2. 8.2.2.1.2 Output Capacitor Selection
          3. 8.2.2.1.3 Input Capacitor Selection
      3. 8.2.3 Application Curves
  9. Power Supply Recommendations
  10. 10Layout
    1. 10.1 Layout Guidelines
    2. 10.2 Layout Example
  11. 11Device and Documentation Support
    1. 11.1 Device Support
      1. 11.1.1 Third-Party Products Disclaimer
    2. 11.2 Community Resources
    3. 11.3 Trademarks
    4. 11.4 Electrostatic Discharge Caution
    5. 11.5 Glossary
  12. 12Mechanical, Packaging, and Orderable Information

封装选项

机械数据 (封装 | 引脚)
散热焊盘机械数据 (封装 | 引脚)
订购信息

5 Pin Configuration and Functions

DRC Package
10-Pin VSON
Top View
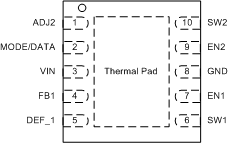
TPS62410 po_lvs676.gif

Pin Functions

PIN I/O DESCRIPTION
NAME NO.
ADJ2 1 I Input to adjust output voltage of converter 2. In adjustable version (TPS62410) connect an external resistor divider between VOUT2, this pin and GND to set output voltage between 0.6 V and VIN. If EasyScale™ interface is used for converter 2, this pin must be directly connected to the output.
MODE/DATA 2 I This Pin has 2 functions:
  1. Operation mode selection: With low level, power-save mode is enabled where the device operates in PFM mode at light loads and enters automatically PWM mode at heavy loads. Pulling this PIN to High forces the device to operate in PWM mode over the whole load range.
  2. EasyScale™ interface function: One wire serial interface to change the output voltage of both converters. The pin has an open-drain output to provide an acknowledge condition if requested. The current into the open-drain output stage may not exceed 500 μA. The interface is active if either EN1 or EN2 is High.
VIN 3 I Supply voltage, connect to VBAT, 2.5 V to 6 V
FB1 4 I Direct feedback voltage sense input of converter 1, connect directly to VOUT1. An internal feed forward capacitor is connected between this pin and the error amplifier. In case of fixed output voltage versions or when the Interface is used, this pin is connected to an internal resistor divider network.
DEF_1 5 I/O This pin defines the output voltage of converter 1. The pin acts in TPS62410 as an analog input for output voltage setting through external resistors. In fixed default output voltage versions this pin is a digital input to select between two fixed default output voltages.
In TPS62410 an external resistor network needs to be connected to this pin to adjust the default output voltage.
SW1 6 Switch pin of converter1. Connected to inductor 1
EN1 7 I Enable input for converter1, active high
GND 8 I GND for both converters, this pin should be connected with the PowerPAD
EN2 9 I/O Enable input for converter 2, active high
SW2 10 Switch pin of converter 2. Connected to inductor 2
PowerPAD™ Connect to GND