ZHCSCV3A July   2013  – September 2014 TPS65631W

PRODUCTION DATA.  

  1. 特性
  2. 应用范围
  3. 说明
  4. 简化电路原理图
  5. 修订历史记录
  6. Pin Configuration and Functions
  7. Specifications
    1. 7.1 Absolute Maximum Ratings
    2. 7.2 Handling Ratings
    3. 7.3 Recommended Operating Conditions
    4. 7.4 Thermal Information
    5. 7.5 Electrical Characteristics
    6. 7.6 Timing Requirements
    7. 7.7 Typical Characteristics
  8. Detailed Description
    1. 8.1 Overview
    2. 8.2 Functional Block Diagram
    3. 8.3 Feature Description
      1. 8.3.1 Boost Converter
      2. 8.3.2 Inverting Buck-Boost Converter
      3. 8.3.3 Soft-Start and Start-Up Sequence
      4. 8.3.4 Enable (CTRL)
      5. 8.3.5 Undervoltage Lockout
      6. 8.3.6 Short Circuit Protection
        1. 8.3.6.1 Short-Circuits During Normal Operation
        2. 8.3.6.2 Short-Circuits During Start-Up
      7. 8.3.7 Output Discharge During Shutdown
      8. 8.3.8 Thermal Shutdown
    4. 8.4 Device Functional Modes
      1. 8.4.1 Operation with VI < 2.9 V
      2. 8.4.2 Operation with VI ≈ VPOS (Diode Mode)
      3. 8.4.3 Operation with CTRL
    5. 8.5 Programming
      1. 8.5.1 Programming VNEG
  9. Applications and Implementation
    1. 9.1 Application Information
    2. 9.2 Typical Application
      1. 9.2.1 Design Requirements
      2. 9.2.2 Detailed Design Procedure
        1. 9.2.2.1 Inductor Selection
        2. 9.2.2.2 Capacitor Selection
        3. 9.2.2.3 Stability
      3. 9.2.3 Application Curves
  10. 10Power Supply Recommendations
  11. 11Layout
    1. 11.1 Layout Guidelines
    2. 11.2 Layout Example
  12. 12器件和文档支持
    1. 12.1 第三方米6体育平台手机版_好二三四免责声明
    2. 12.2 相关链接
    3. 12.3 商标
    4. 12.4 静电放电警告
    5. 12.5 术语表
  13. 13机械封装和可订购信息

封装选项

机械数据 (封装 | 引脚)
散热焊盘机械数据 (封装 | 引脚)
订购信息

11 Layout

11.1 Layout Guidelines

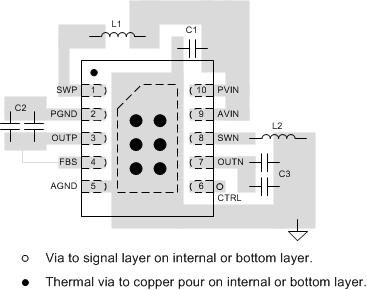
No PCB layout is perfect and compromises are always necessary. However, following the basic principles listed below (in order of importance) should go a long way to achieving good performance:

  • Route switching currents on the top layer using short, wide traces. Do not route these signals through vias, which have relatively high parasitic inductance and resistance.
  • Use a copper pour on layer 2 as a ground plane and thermal spreader, and connect the thermal pad to it using a number of thermal vias.
  • Place C1 as close as possible to pin 10.
  • Place C2 as close as possible to pins 2 and 3.
  • Place C3 as close as possible to pin 7.
  • Place L1 as close as possible to pin 1.
  • Place L2 as close as possible to pin 10.
  • Use the thermal pad to join AGND and PGND.
  • Connect the FBS pin directly to the positive pin of C2, that is, keep this connection separate from the connection between OUTP and C2.

Figure 24 illustrates how a PCB layout following the above principles may be realized in practice.
11.2 Layout Example

Figure 24 shows the above principles implemented for the circuit of Figure 9.

Layout_01_TPS65631W.gifFigure 24. PCB Layout Example