SLAA517F May 2012 – August 2021 MSP430F6720A , MSP430F6720A , MSP430F6721A , MSP430F6721A , MSP430F6723A , MSP430F6723A , MSP430F6724A , MSP430F6724A , MSP430F6725A , MSP430F6725A , MSP430F6726A , MSP430F6726A , MSP430F6730A , MSP430F6730A , MSP430F6731A , MSP430F6731A , MSP430F6733A , MSP430F6733A , MSP430F6734A , MSP430F6734A , MSP430F6735A , MSP430F6735A , MSP430F6736 , MSP430F6736 , MSP430F6736A , MSP430F6736A
6.2.2 Phase Correction
Phase correction has to be done differently and the following is the procedure.
- Set voltage and current values to the same as Gain correction and introduce a known phase shift between voltage and current to +60°.
- See % error on the test setup. If errors are not acceptable, enter correction factors in the Phase (low) field. Only increments and decrements should be entered in this field and preferably start with 1 or -1 to determine the direction of correction. Click "Update meter".
- Measure error again to see if error has increased or decreased. If error has decreased, continue to add desired increments until you arrive at an error close to zero, else add decrements.
- Click on "Update meter" every time a modification is made to this field.
- Change the phase now to -60° and check if this error is still acceptable. If not, fine tune the values of Phase (low) again. Ideally, errors should be symmetric for same phase shift on lag and lead conditions.
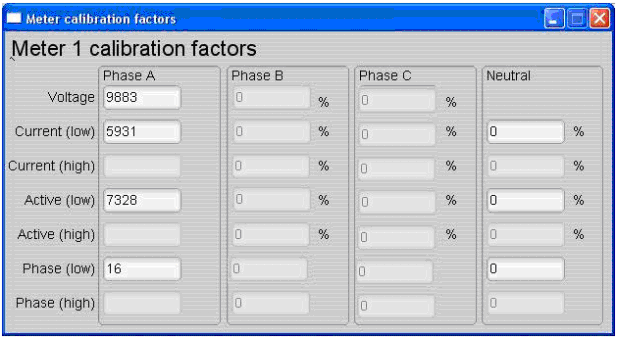
After the meter has been calibrated, it is possible to see these calibrated values for reference. Click "Meter calibration factors" to open this screen (sample values only).
 Figure 6-5 Meter Calibration Factors
If the calibration procedure goes wrong, such that the calibration values are either negative or zero, further calibration of the meter should be stopped and code must be reloaded on to the device and the calibration routine repeated.