SPRACO3 October 2019 INA240 , LMG5200 , TMS320F280021 , TMS320F280021-Q1 , TMS320F280023 , TMS320F280023-Q1 , TMS320F280023C , TMS320F280025 , TMS320F280025-Q1 , TMS320F280025C , TMS320F280025C-Q1 , TMS320F280040-Q1 , TMS320F280040C-Q1 , TMS320F280041 , TMS320F280041-Q1 , TMS320F280041C , TMS320F280041C-Q1 , TMS320F280045 , TMS320F280048-Q1 , TMS320F280048C-Q1 , TMS320F280049 , TMS320F280049-Q1 , TMS320F280049C , TMS320F280049C-Q1 , TMS320F28374D , TMS320F28374S , TMS320F28375D , TMS320F28375S , TMS320F28375S-Q1 , TMS320F28376D , TMS320F28376S , TMS320F28377D , TMS320F28377D-EP , TMS320F28377D-Q1 , TMS320F28377S , TMS320F28377S-Q1 , TMS320F28378D , TMS320F28378S , TMS320F28379D , TMS320F28379D-Q1 , TMS320F28379S
-
Dual-Axis Motor Control Using FCL and SFRA On a Single C2000 MCU
- Trademarks
- 1 Introduction
- 2 Benefits of the C2000 for High-Bandwidth Current Loop
- 3 Current Loops in Servo Drives
- 4 PWM Update Latency for Dual Motor
- 5 Outline of the Fast Current Loop Library
- 6 Evaluation Platform Setup
- 7 System Software Integration and Testing
- 8 Summary
- 9 References
7.6.5 Running the SFRA GUIs
If the power supply to the inverter board is turned off before, restore it back now. From the debug environment, the steps to be followed are as shown below:
- Verify that sfraTestLoop is set to SFRA_TEST_D_AXIS so as to test Id loop.
- Set 'motorVars[0].FCL_params.wccD' to the desired value, within limits, (when test is performed for Q axis, adjust this parameter for Q axis - motorVars[0].FCL_params.wccQ)
- Set motorVars[0].speedRef = 0.05 (in pu, 1 pu = 250Hz) and then set motorVars[0].runMotor = MOTOR_RUN to run the motor. Now motor shaft should start spinning and settle at the commanded speed.
- The state machine variable (motorVars[0].ptrFCL->lsw) is auto promoted in a sequence, its states are as follows:
- lsw = ENC_ALIGNMENT --> lock the rotor of the motor.
- lsw = ENC_WAIT_FOR_INDEX --> motor in run mode and waiting for the first instance of QEP index pulse.
- lsw = ENC_CALIBRATION_DONE --> motor in run mode - QEP index pulse occurred.
- Now, the GUI can be called into perform a frequency sweep of the D axis current loop by clicking on the "Start Sweep" button in the GUI. The sweep progress will be indicated by a green bar in the location marked as "NO DATA".
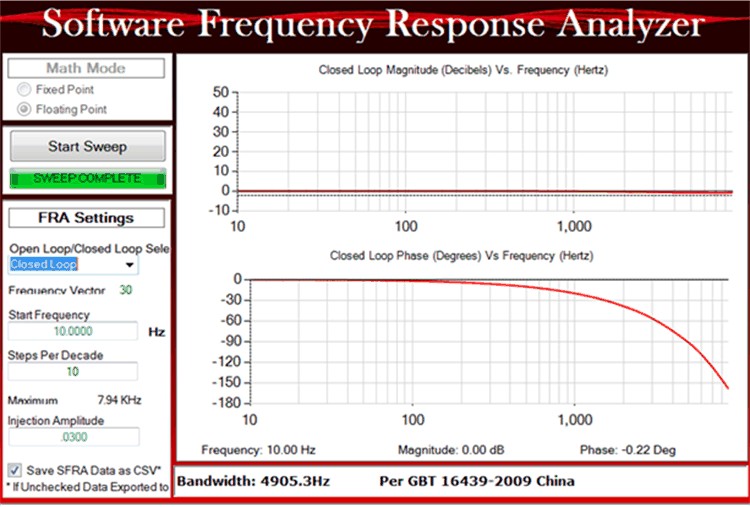
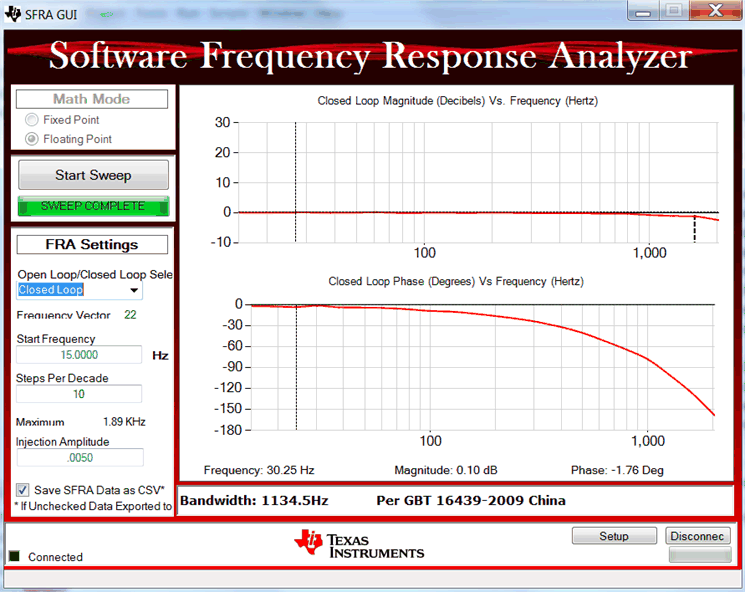
- When the frequency sweep is fully done, it will compute the Bode plot and display the results as shown in Figure 36 and Figure 37.
- The GUI also computes and displays the loop bandwidth, gain margin and phase margin.
- Repeat the test, if desired, by changing the variable 'motorVars[0].FCL_params.wccD', and at different speed and load conditions.
- To disconnect the GUI, click the 'Disconnect' button on the GUI.
- To stop the motor, set 'motorVars[0].runMotor' to 'MOTOR_STOP'.
- After the motor stops, take the controller out of real-time mode and reset.
 Figure 36. SFRA Open Loop Bode Plots of the Current Loop Showing Magnitude and Phase Angle
  Figure 37. SFRA Closed Loop Bode Plots of the Current Loop Showing Magnitude and Phase Angle
 The same set of tests can be done on motor 2 by working with structure variable 'motorVars[1]', and by changing the SFRA_MOTOR to MOTOR_2 (#define SFRA_MOTOR MOTOR_2) in "dual_axis_servo_drive_settings.h".