SPRUIL2A February   2019  – September 2019 OMAP-L132 , OMAP-L138 , TMS320C6742 , TMS320C6746 , TMS320C6748


  1.   OMAP-L138/C6748 Low-Cost Development Kit (LCDK)
    1.     Trademarks
    2. 1 Introduction
      1. 1.1 Features
      2. 1.2 Getting Started
    3. 2 Included in the Box
      1. 2.1 OMAP-L138/C6748 Low-Cost Development Kit Contents
      2. 2.2 Development Support
      3. 2.3 Embedded Linux Application Development Support
    4. 3 Setting up the OMAP-L138/C6748 Development Kit (LCDK)
      1. 3.1 User Interface
        1. 3.1.1 Push Buttons
        2. 3.1.2 LEDs
        3. 3.1.3 Power
        4. 3.1.4 USB-to-UART Port (J3)
      2. 3.2 Setup the Out of the Box Demonstration on LCDK
      3. 3.3 Initial Setup
      4. 3.4 Running the Face Detect Demo
      5. 3.5 Procedure to Flash and Boot the LCDK
    5. 4 LCDK Features
      1. 4.1 Video
      2. 4.2 Memory
      3. 4.3 Connectivity
      4. 4.4 LCD Connector
    6. 5 Power Sequencing
    7. 6 Online Resources
      1. 6.1 C6748/ OMAP-L138 Product Information
      2. 6.2 LCDK Hardware and Software Documentation
        1. 6.2.1 LCDK Board Revision History
      3. 6.3 CCS XML and GEL Files
      4. 6.4 Hardware Setup With CCS
      5. 6.5 Software
    8. 7 Projects
      1. 7.1 Finger Printing Demonstration
      2. 7.2 Face Detection Demonstartion
    9. 8 Support
    10. 9 References
  2.   Revision History

Initial Setup

The following steps describe the initial setup of the LCDK:

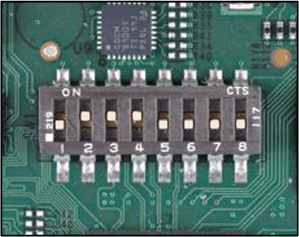
  1. Set DIP switch SW1 as shown in Figure 3:
    1. Positions 2, 3, and 4 ON
    2. Positions 1, 5, 6, 7, and 8 OFF
  2. spruil2-how-to-setup-c6748-omapl138-development-kit-1.gifFigure 3. SW1 Settings
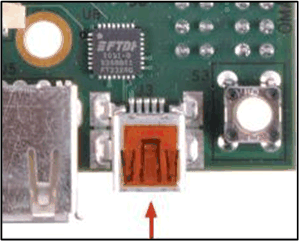
  3. Connect the supplied mini USB cable to J3 on the LCDK, as shown in Figure 4. Connect the other end of the cable to a USB port on your host computer.
  4. spruil2-how-to-setup-c6748-omapl138-development-kit-2.gifFigure 4. UART-to-USB Port
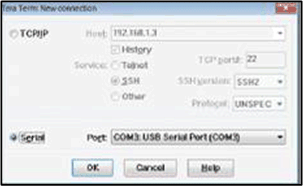
  5. Open a serial port terminal (Tera Term) on the host computer and select the connection to the USB serial port.
  6. spruil2-how-to-setup-c6748-omapl138-development-kit-3.gifFigure 5. Tera Term Port Selection
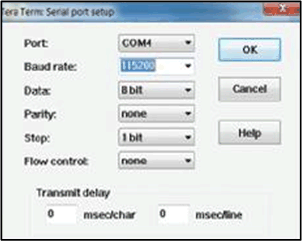
  7. Configure the serial port as shown in Figure 5.
    1. Select the COM port that corresponds to the USB device.
    2. Baud rate: 115200
    3. Data: 8 bit
    4. Parity: none
    5. Stop: 1 bit
    6. NOTE

      To do this in Tera Term, go to Setup → Serial port.

  8. spruil2-how-to-setup-c6748-omapl138-development-kit-4.gifFigure 6. Tera Term Baud Rate Selection
  9. Power the board up.