SSZT253 september 2020 DS90UB953-Q1
As automotive camera technology advances with higher resolutions, dynamic ranges and frame rates, power-supply architectures need tailoring to the specific use-case requirements. In this article, I’ll review three strategies you can use to power your automotive camera module:
- Fully discrete
- Fully integrated
- Partially integrated
The focus in this article is on small-form-factor camera modules that don’t include any data processing, and output raw video data to a separate electronic control unit. These modules are often found in surround-view, driver-monitoring and mirror-replacement systems and receive a pre-regulated supply voltage over the same coaxial cable used for video data output.
How much power do you need for a camera module?
 Figure 1 Calculating the power budget
for each rail
Figure 1 Calculating the power budget
for each railOne might suggest using a low-dropout regulator (LDO) for every supply considering its excellent noise performance. However, that is not feasible when designing with a limited power budget. Additionally, increasing current will stress connectors and cables and increase self heating of the camera, which may worsen performance.
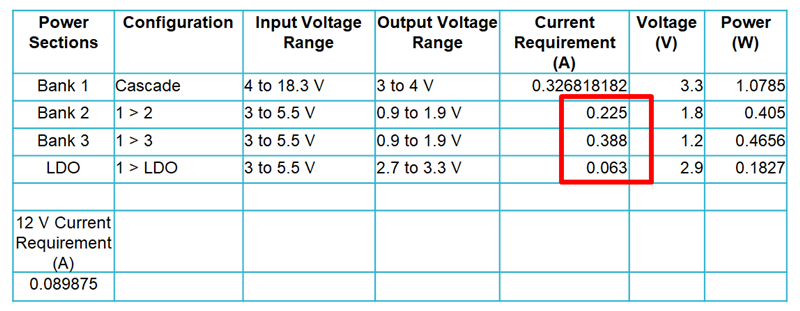
As shown in the example calculation in Table 1, the current requirements for camera modules are generally determined by the sensor and FPD-Link device included in the system. In this example, the imager rails are 1.2 V, 1.8 V and 2.9 V. The FPD-Link device shares the same 1.8-V rail. The required currents for normal operation are highlighted in red.
 Figure 2 Table 1: An example calculation with imager rails at 1.2 V, 1.8 V and 2.9
V
Figure 2 Table 1: An example calculation with imager rails at 1.2 V, 1.8 V and 2.9
VIn this example, the PoC supply over the coaxial cable is first stepped down to 3.3 V, which then supplies the rest of the system on the camera module. The 2.9-V sensor analog rail is tied directly to an LDO output, while the other supplies are tied to a step-down (buck) converter. The 1.8-V rail supplies both the DS90UB953-Q1 supply, and the interface supply of the imager. Since the current consumed by the DS90UB953-Q1 serializer is predominantly greater than the imager interface supply, the 1.8-V current provided to the imager can be considered as negligible. The imager 2.9-V analog rail requires 63 mA, the DS90UB953-Q1 serializer 1.8-V rail requires 225 mA and the imager digital 1.2-V rail requires 388 mA. Assuming 100% efficiency to simplify calculations with the previous values, it is calculated that the 3.3-V supply will require 327 mA to successfully power the 1.2-V, 1.8-V, and 2.9-V rails.
Because the input and output voltages, output current requirements, and total wattage consumption are known, the input current can be calculated with:
(PoC Voltage)*(Current Required) = 3.3-v * 327 mA
For a PoC Voltage of 12-v, the ECU Would Source 90 mA.
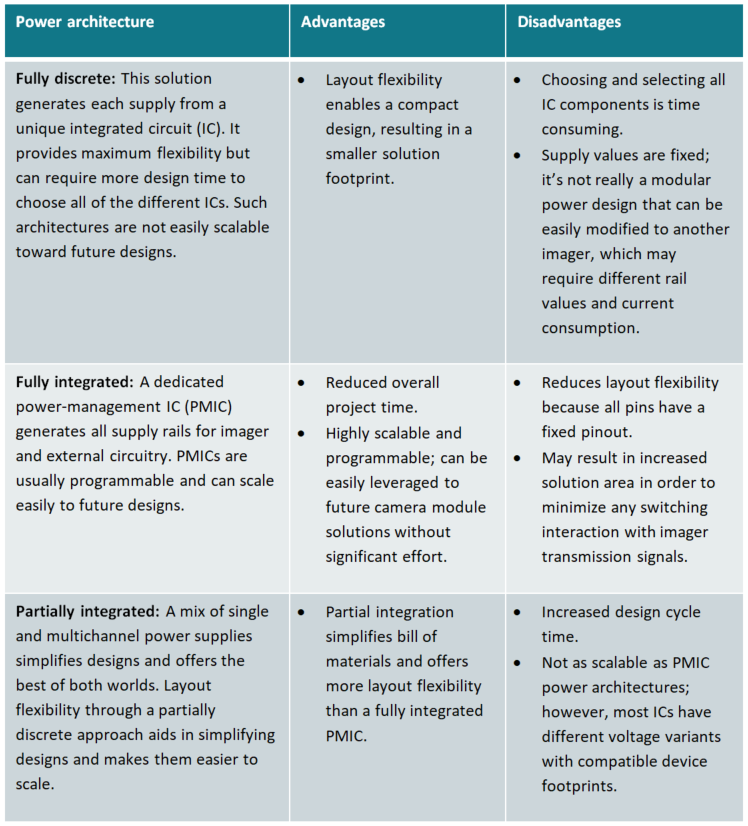
Three power architectures for automotive camera modules
 Figure 3 Table 2: Comparing camera
module power architectures
 Supply considerations
- Minimizing the total solution size to meet the small form factor of automotive camera module enclosures. Such enclosures are typically around 20 mm by 20 mm in area and usually fit within an M12 barrel plastic enclosure.
- Avoiding interference with the AM radio band. All switching power supplies need to be outside the AM radio band of 540 kHz to 1,700 kHz.
- Avoiding lower switching frequencies because they require large inductors. Instead, choose:
- High-frequency switchers (>2 MHz).
- Devices that are Automotive Electronics Council-Q100 rated.
- Electronics that need added protection such as a short-to-battery can design with wide Vin regulators.
Printed circuit board constraints
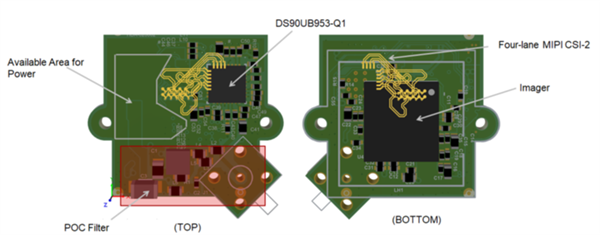
 Figure 4 Example layout of the DS90UB953-Q1 with an imager
Choose your power architecture
- Fully discrete: Automotive 2-MP Camera Module Reference Design with MIPI CSI-2 Video Interface, FPD-Link III and POC.
- Fully integrated: Automotive 2-MP Camera Module Reference Design with MIPI CSI-2 Interface, PMIC, FPD-Link III and POC.
- Partially integrated, part 1: Automotive 2-MP Camera Module Reference Design with MIPI CSI-2 Video Interface, FPD-Link III and POC and part 2: Automotive 2.6-MP Camera Module Reference Design with POL PMIC, FPD-Link III, Supervisor and POC.