SSZTBP7 January 2016 LM317
During a recent visit back home, my father approached me with a design challenge. He wanted me to harness energy from a solar cell, but he needed a simple solution he could also understand. After searching his place, I figured I could come up with a simple design from the devices and tools we had lying around. “Challenge accepted,” I said.
In this post, I’ll guide you through my process and the simple power solution I designed for my dad. It leverages the power of solar energy with very little materials or board space required. Spoiler alert, it also makes dads happy!
Design and Implementation
I picked a relatively low-power solar panel or photovoltaic (PV) system for this design: 20W is good enough to enable a 12V or 6V output to our system with currents below or around 1.5A. Unfortunately, you can’t simply connect your PV to the end equipment. While most systems today come prepared with an internal voltage regulator, the PV will swing in voltage depending on how much sunlight it receives. A 12V PV can fluctuate between 0.65V (with no sunlight) to as much as 15V; this could damage the targeted end equipment if it’s rated for 12V.
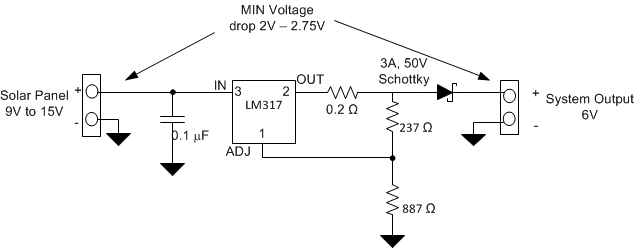
So you need to include a control circuit that could give you an ideal or constant DC voltage to power up your system and make sure to clean out the fluctuation noise from the input voltage. You can do this very easily by applying a low-dropout regulator (LDO) with a wide enough input-voltage operation. For this example I used TI’s LM317 with an adjustable output to make the application as flexible as possible, as shown in Figure 1. Using a lead-acid battery as the end system preserves harvested power, as both voltage and current will drop later at night or with little sunlight.
 Figure 1 Control Circuit Schematic
Power Dissipation and Dropout Voltage
In this design, the total power administered will be limited by the thermal resistances of your selected LDO. You could also apply a heat sink as necessary to cool your system further during high-current needs or if the ambient temperature is too high. If using the LM317, you’ll need to keep the temperature below 125°C max, and using the TO-220 package means that you’ll also need to limit power dissipation to ~4.5W (if using 0.5A as the output). This precaution ensures that you have enough bandwidth to enable a system within 40°C ambient temperatures. Fortunately, the LM317 has an internal temperature shutdown, which will prevent damage if the device gets too hot.
Considering the worst-case scenarios, Equation 1 calculates the power for a 12V PV applied to a 6V battery through the control circuit:
In this case, the solar panel will never exceed the selected 4.5W. However, you can achieve a higher current output by applying a thermal heat sink.
When the battery is fully charged, the battery voltage will be high but the current will be very low, thus reducing dropout voltage and having the open circuit from your PV come into play. I selected a Schottky rectifier to reduce the dropout requirement and protect the battery from discharging once the voltage at the battery node was higher than the needed dropout.
This circuit’s advantages and disadvantages include:
- (+) Standard, readily available devices; small board; inexpensive.
- (+) Designable for adjustable voltage outputs; zero battery discharge when the sun is not shining.
- (-) High voltage dropout (depending on the LDO); the dropout may be too high depending on the output voltage. (You can easily remediate this by using a switching regulator or lower dropout voltage LDO.)
- (-) Not many bells and whistles; no indicators or light emitting diodes (LEDs). Functionality will entirely depend on the LDO.
You can also apply this circuit to battery chemistries that require a constant DC voltage. Applying other LDOs and changing the battery ensures lower power dissipation and improves overall system efficiency. You could also apply a boost converter to leverage the power output from the PV in low sunlight conditions; however, other systems will require a few more components or a redesign.
If you have created your own solar solution, leave a comment below and let me know how you designed your power solution.
Additional Resources
- Check out how to design your next solar inverter system
- Try out TI’s WEBENCH® design tool to figure out your design with the LM317.
- Get more information about TI’s linear regulators.
- Get started on your design with the TI Designs Grid-Tied Solar Micro Inverter with MPPT reference design.