SWRU558 June   2020 CC3100 , CC3100MOD , CC3200 , CC3200MOD


  1.   SimpleLink Wi-Fi CC3100, CC3200 UniFlash
    1.     Trademarks
    2. Introduction
      1. 1.1 Overview
    3. Installation
      1. 2.1 Linux
        1. 2.1.1 Limitations
        2. 2.1.2 During Installation
        3. 2.1.3 Running UniFlash
        4. 2.1.4 C++ Dependencies
        5. 2.1.5 COM Port
        6. 2.1.6 Porting Between Windows and Linux
    4. Prerequisites
      1. 3.1 Software
      2. 3.2 Hardware
    5. Uniflash Block Diagram
    6. Session Support
      1. 5.1 Overview
      2. 5.2 Session Conversion
      3. 5.3 Creating a Session
        1. 5.3.1 Session Content
        2. 5.3.2 Creation Procedure
        3. 5.3.3 Relative Path Support
      4. 5.4 Saving a Session
      5. 5.5 Loading a Session
    7. Secured File System Support
    8. GUI Interface
      1. 7.1 Main Screen
      2. 7.2 Target Connection
      3. 7.3 Format
      4. 7.4 Get Version
      5. 7.5 File Programming
        1. 7.5.1 General
        2. 7.5.2 Non-Secured File Programming
        3. 7.5.3 Secured File Programming
      6. 7.6 Service Pack Programing
        1. 7.6.1 General
        2. 7.6.2 Procedure
      7. 7.7 Adding a New File to the Device
      8. 7.8 Erasing Existing File From the Device
      9. 7.9 Removing Existing File From the Template
    9. CC3200 Support
      1. 8.1 Overview
      2. 8.2 Configuration and Programing
    10. Command Line Support
      1. 9.1 Overview
      2. 9.2 Programming
        1. 9.2.1 Command Line Syntax
        2. 9.2.2 Help Manual
      3. 9.3 Available Options
        1. 9.3.1 Available Operations
        2. 9.3.2 Legend
        3. 9.3.3 Programming Example
    11. 10 Configuration File Support
      1. 10.1 Overview
      2. 10.2 Configuration Groups – Parameters’ Description
        1. 10.2.1 Device Role
        2. 10.2.2 Station
        3. 10.2.3 Access Point (AP)
        4. 10.2.4 Peer 2 Peer (P2P)
        5. 10.2.5 Profiles
        6. 10.2.6 HTTP Server
        7. 10.2.7 DHCP Server
        8. 10.2.8 mDNS Client
        9. 10.2.9 Smart Config
      3. 10.3 Configuration Groups – GUI Interface
        1. 10.3.1 Device Role
          1. 10.3.1.1 Restore to Default
          2. 10.3.1.2 Programming
          3. 10.3.1.3 Generation of Binary Templates
          4. 10.3.1.4 Configuration
        2. 10.3.2 Station
          1. 10.3.2.1 Restore to Default
          2. 10.3.2.2 Programming
          3. 10.3.2.3 Generation of Binary Templates
          4. 10.3.2.4 Flow
          5. 10.3.2.5 Configuration
        3. 10.3.3 Access Point (AP)
          1. 10.3.3.1 Restore to Default
          2. 10.3.3.2 Programming
          3. 10.3.3.3 Generation of Binary Templates
          4. 10.3.3.4 Flow
          5. 10.3.3.5 Configuration
        4. 10.3.4 Peer 2 Peer (P2P)
          1. 10.3.4.1 Restore to Default
          2. 10.3.4.2 Programming
          3. 10.3.4.3 Generation of Binary Templates
          4. 10.3.4.4 Flow
          5. 10.3.4.5 Configuration
        5. 10.3.5 HTTP Server
          1. 10.3.5.1 Restore to Default
          2. 10.3.5.2 Programming
          3. 10.3.5.3 Generation of Binary Templates
          4. 10.3.5.4 Flow
          5. 10.3.5.5 Configuration
        6. 10.3.6 DHCP Server
          1. 10.3.6.1 Restore to Default
          2. 10.3.6.2 Programming
          3. 10.3.6.3 Generation of Binary Templates
          4. 10.3.6.4 Flow
          5. 10.3.6.5 Configuration
        7. 10.3.7 mDNS Client
          1. 10.3.7.1 Restore to Default
          2. 10.3.7.2 Programming
          3. 10.3.7.3 Generation of Binary Templates
          4. 10.3.7.4 Adding/Deleting a Service
          5. 10.3.7.5 Flow
          6. 10.3.7.6 Configuration
        8. 10.3.8 Profiles
          1. 10.3.8.1 Restore to Default
          2. 10.3.8.2 Programming
          3. 10.3.8.3 Generation of Binary Templates
          4. 10.3.8.4 Adding/Deleting a Profile
          5. 10.3.8.5 Flow
          6. 10.3.8.6 Configuration
        9. 10.3.9 Smart Config
          1. 10.3.9.1 Restore to Default
          2. 10.3.9.2 Programming
          3. 10.3.9.3 Generation of Binary Templates
          4. 10.3.9.4 Flow
          5. 10.3.9.5 Configuration
    12. 11 Image Creation and Programming
      1. 11.1 Overview
      2. 11.2 Basic Concept and Operation
      3. 11.3 Image Creation – Supported Commands
        1. 11.3.1 Overview
        2. 11.3.2 General Settings
        3. 11.3.3 Format Storage Command
        4. 11.3.4 Write Service Pack Command
        5. 11.3.5 Write File Command
        6. 11.3.6 Write Gang Image Command
        7. 11.3.7 Start Logger Command
      4. 11.4 Image Creation – GUI Interface
        1. 11.4.1 Image Programming Summary Window
        2. 11.4.2 Image Programming Buttons
          1. 11.4.2.1 Add
          2. 11.4.2.2 Remove
          3. 11.4.2.3 Move
          4. 11.4.2.4 Program
          5. 11.4.2.5 Export
          6. 11.4.2.6 Settings
      5. 11.5 Image Programming to Target
      6. 11.6 How to Build an Image Guide
      7. 11.7 Serial Flash usage and Design
        1. 11.7.1 Overview
        2. 11.7.2 File System Guidelines
        3. 11.7.3 Memory Usage
          1. 11.7.3.1 Device Generic
          2. 11.7.3.2 Image Specific
      8. 11.8 Image Creation – Troubleshooting
    13. 12 Troubleshoot/Debugging
    14. 13 Limitations
    15. 14 References
  2.   A UART Connection
    1.     A.1 UART Connection

Troubleshoot/Debugging

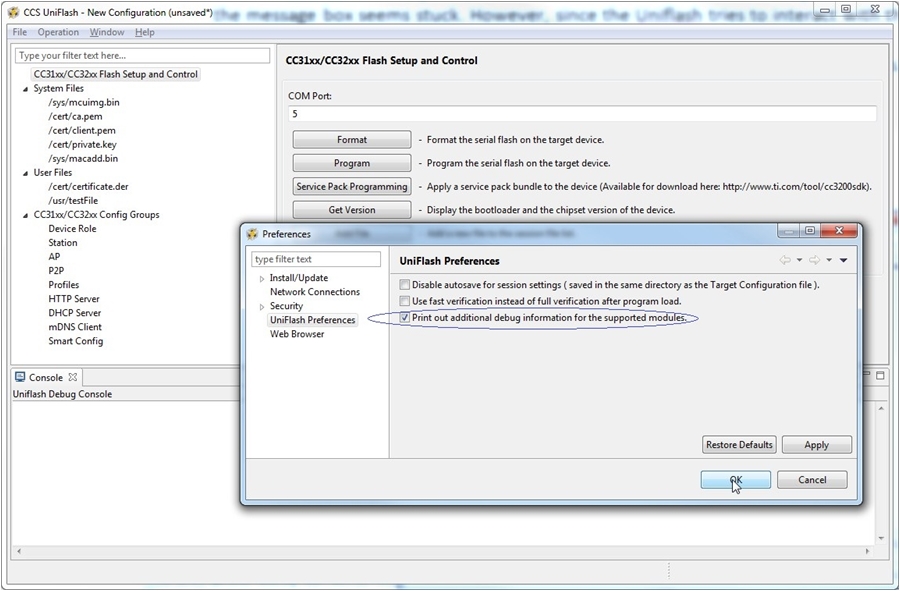
Debug messages are printed on the 'Console' screen. It is possible to control the verbose level of these printouts from the 'Window → Preferences'. Under 'Uniflash Preferences', the 'Print out additional debug information for the supported modules' should be checked for full debug messages.

By default, this mode is enabled.

The following is a list of common Uniflash behaviors that might be perceived as erroneous but are actually not:

  • Pressing 'cancel' during the program operation. In this case, the progress bar on the message box is frozen and the Uniflash seems stuck. However, the Uniflash continues flashing the current file and when it is done, the message box is released. This is desired since there is no point in canceling during flashing as it may cause unexpected behavior in the device. In addition, if debugging information is enabled, the flashing messages can be seen on the Console screen.
  • Connecting to the device is applied on every operation (Program, Format, Get Version). When 'cancel' button is pressed during connection, the message box seems stuck. However, since the Uniflash tries to interact with the target device over UART and the user does not reset the board, it can take up to UART timeout for the cancel operation to take effect. UART timeout is 15 seconds. When the time elapses, the message box is released.
cc3x00-gui-03-debugging-swru558.jpgFigure 54. Debugging