SWRU580 April 2021 CC2564C , CC2564MODA , CC2564MODN
- Trademarks
- 1 Introduction
- 2 A2DP (AUD) Demo Guide
- 3 A3DP Sink Demo Guide
- 4 A3DP Source Demo Guide
- 5 HFP Demo Guide
- 6 HFP Audio Gateway Demo Guide
- 7 HID Demo Guide
- 8 HSP Demo Guide
- 9 Map Demo Guide
- 10PBAP Demo Guide
- 11SPP Demo Guide
- 12SPPLE Demo Guide
- 13SPPDMMulti Demo Guide
- 14ANP Demo Guide
- 15HFP Demo Guide
- 16HTP Demo Guide
- 17PASP Demo Guide
- 18HOGP Demo Guide
- 19PXP Demo Guide
- 20FMP Demo Guide
- 21CSCP Demo Guide
- 22Revision History
8.2 Demo Application
This section provides a description of how to use the demo application to connect smart phone over Bluetooth HSP profile, the same for the second smart phone. Bluetooth HSP is a simple Client-Server connection process with one side, the Client, operating in the Audio-Gateway role and the other, the Server, operating in the Handsfree role. We will setup the boards as a Handsfree Server and use an android phone as the Client. Once connected, we can use the STM3240G-EVAL board as headset, with audio connected to the earphone jack.
Headset role
Server setup on the demo application
- After initialization of the
application we need to choose our role, this section will describe the
Headset role, issue the Headset command in order to choose
this role. After selecting the role you will be able to see the commands for
this role.
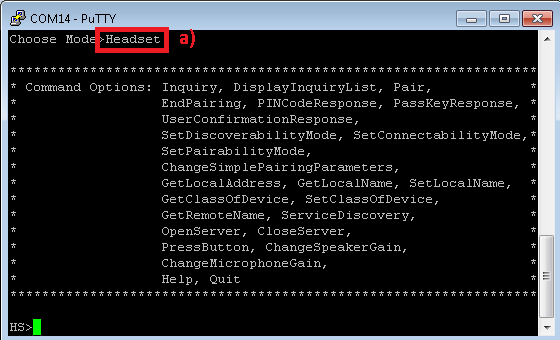 Figure 8-2 HSP Demo Headset
Role
 - Optional: Give a name for the
STM3240G-EVAL board issuing the SetLocalName command. In our example we
give it a name of hspserver. The default application name is
HSPDemo
 Figure 8-3 HSP Demo Set Name
Print
 - Open a HSPServer by isssuing the
OpenServer command. Below we use OpenServer to open the port.Client setup and device discovery
 Figure 8-4 HSP Demo Open
Server
 - Open the bluetooth settings menu on the android phone Settings->Bluetooth. The menu should look similar to the picture below in step 5.
- Hit on Search for devices.
The phone should begin looking for other bluetooth devices.
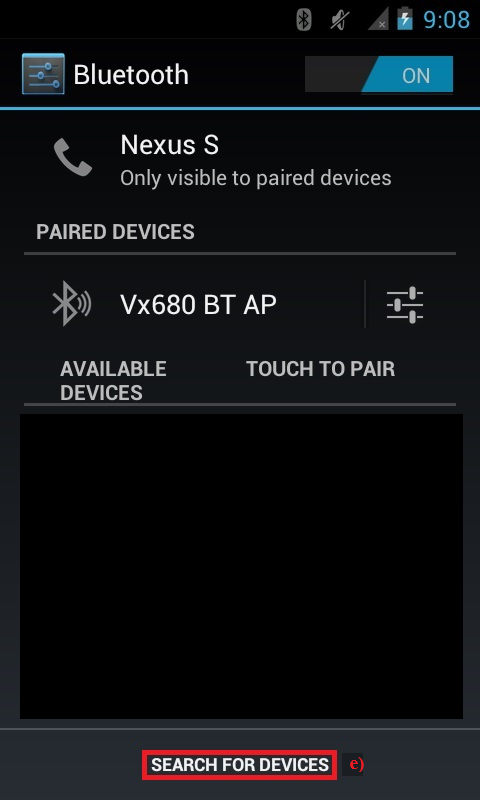 Figure 8-5 HSP Demo Bluetooth
Settings
 - The Demo device should appear
like shown below in the picture with the given name from section b. or
the default name HSPDemo. Click on the device name to begin pairing.
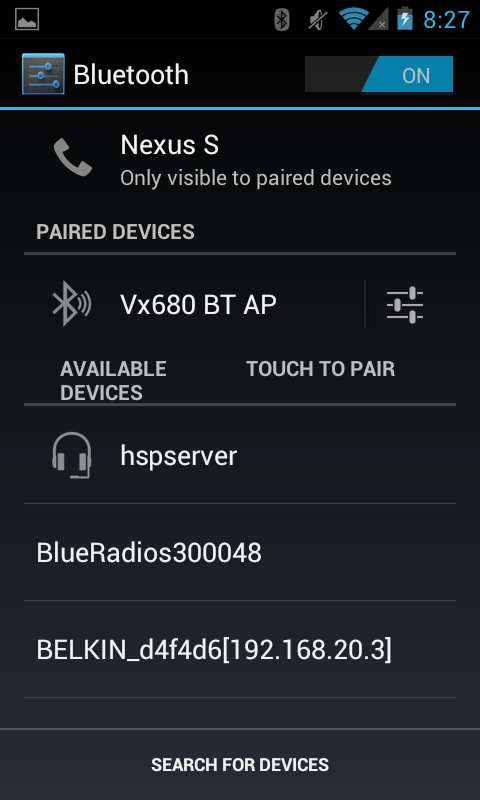 Figure 8-6 HSP Demo Bluetooth
Search
 - After the devices are paired (In
legacy pairing the Android will prompt for four digits code and then the
terminal prompts for PINCodeResponse that should be answered with
PINCodeResponse <Four digit code>, the device should show
connected on the phone side and print Open Service Level Connection
Indication on the terminal .
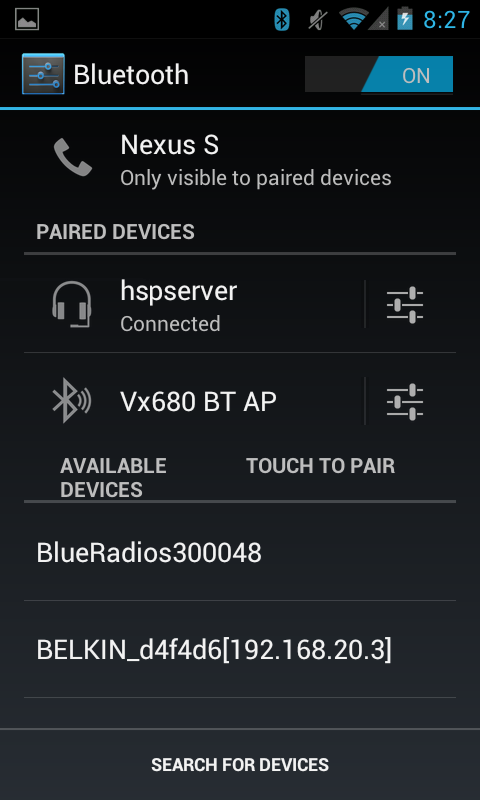 Figure 8-7 HSP Demo Bluetooth
Connected
 Figure 8-8 HSP Demo Connection
 - To Answer an Incoming Call or hang up an active call use PressButton
Command.
 Figure 8-9 HSP Demo Answer
Call
 Figure 8-10 HSP Demo Hang up Call
 - To Close the HSPserver,
issue the CloseServer <port number> command.
 Figure 8-11 HSP Demo Close
Server
The following instructions connect two boards running the HSP profile as a Headset and Audio Gateway.
- After initialization of the
application on the first board, we need to choose our role, this section will
describe the Headset role, issue the Headset command in order to
choose this role. After selecting the role you will be able to see the commands
for this role.
 Figure 8-12 HSP Demo Headset
Role
 - Optional: Give a name for the
STM3240G-EVAL board issuing the SetLocalName command. In our example we
give it a name of hspserver. The default application name is
HSPDemo.
 Figure 8-13 HSP Demo Set Name
Print
 - Open a HSPServer by isssuing the
OpenServer command. Below we use OpenServer to open the port.Client setup and device discovery
 Figure 8-14 HSP Demo Open
Server
 - After initialization of the
application on the second board, we need to choose our role, this section will
describe the Audio Gateway role. Issue the AudioGateway command in
order to choose this role. After selecting the role you will be able to see the
commands for this role.
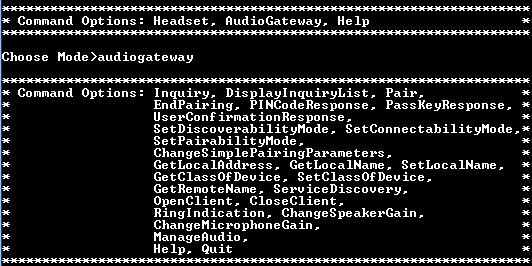 Figure 8-15 HSPD Demo Audio
Gateway Audio Role
 - In order to open the
Client port, we need to find the device we want to connect to, to do
so we issue the Inquiry command to start scanning for nearby devices.
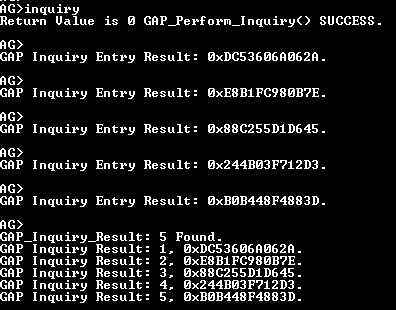 Figure 8-16 HSP Demo Audio Gateway
Display Inquiry
 - After the Inquiry command has finished a list of found devices will be printed to the console. Note that we can retrieve the list again by issuing the DisplayInquiryList command.
- After we found the device we need
to issue the OpenClient command to open the Client port.
 Figure 8-17 HSP Demo Open
Client
 - You should receive an HDSET
Open Remote Headset Port indication on the Client and
Server consoles:
 Figure 8-18 HSP Demo Client
Connection
Figure 8-18 HSP Demo Client
ConnectionThe Server console also prints out the connected BD_ADDR.
 Figure 8-19 HSP Demo Server
Connection
 - You must now ring the
Server device in order to begin the audio streaming process. This can be
accomplished by issuing the RingIndication command on the
Client.
 Figure 8-20 HSP Demo Start
Connection
 - The Server will receive a
HDSET Ring Indication.
 Figure 8-21 HSP Demo Ring
Indication Notification
 - To Answer the Incoming Call or
hang up an active call issue the PressButton command from the
Server.
 Figure 8-22 HSP Demo Server Press
Button
 - The Client will receive
both a HDSET Button Pressed and HDSET Audio Connection
indications.
 Figure 8-23 HSP Demo Button
Pressed Indication
 - To Close the HSPserver, issue the CloseServer <port number> command.
This demonstrates setting up the client to connect to a commercial headset.
- This section will describe the Audio Gateway role. Issue the
AudioGateway command in order to choose this role. After selecting
the role you will be able to see the commands for this
role.
OpenStack(). Stack Initialization on Port 1 115200 (UART) Successful. Bluetooth Stack ID: 1 Device Chipset: 4.1 BTPS Version : 4.0.3.0 Project Type : 6 FW Version : 7.26 App Name : HSPDemo App Version : 0.1 LOCAL BD_ADDR: 0xB0B448F49D74 GAP_Set_Connectability_Mode(cmConnectable). GAP_Set_Discoverability_Mode(dmGeneralDiscoverable, 0). GAP_Set_Pairability_Mode(pmPairableMode). GAP_Register_Remote_Authentication() Success. ****************************************************************** * Command Options: Headset, AudioGateway, Help * ****************************************************************** Choose Mode>AudioGateway ****************************************************************** * Command Options: Inquiry, DisplayInquiryList, Pair, * * EndPairing, PINCodeResponse, PassKeyResponse, * * UserConfirmationResponse, * * SetDiscoverabilityMode, SetConnectabilityMode,* * SetPairabilityMode, * * ChangeSimplePairingParameters, * * GetLocalAddress, GetLocalName, SetLocalName, * * GetClassOfDevice, SetClassOfDevice, * * GetRemoteName, ServiceDiscovery, * * OpenClient, CloseClient, * * RingIndication, ChangeSpeakerGain, * * ChangeMicrophoneGain, * * ManageAudio, * * Help, Quit * ****************************************************************** - In order to open the Client port, we need to find the device we want to
connect to, to do so we issue the Inquiry command to start scanning for
nearby
devices.
AG>Inquiry Return Value is 0 GAP_Perform_Inquiry() SUCCESS. - After the Inquiry command has finished a list of found devices will be printed
to the console.Note: We can retrieve the list again by issuing the DisplayInquiryList command.
AG> GAP Inquiry Entry Result: 0x244B03F712D3. AG> GAP Inquiry Entry Result: 0x340286605044. AG> GAP Inquiry Entry Result: 0x000DFD4072EF. AG> GAP_Inquiry_Result: 3 Found. GAP Inquiry Result: 1, 0x244B03F712D3. GAP Inquiry Result: 2, 0x340286605044. GAP Inquiry Result: 3, 0x000DFD4072EF. - You can verify the device you want to connect to by issuing the GetRemoteName
<Inquiry Index>
command.
AG>GetRemoteName 3 GAP_Query_Remote_Device_Name: Function Successful. AG> GAP Remote Name Result: BD_ADDR: 0x000DFD4072EF. GAP Remote Name Result: Motorola S10-HD. - Discover services of the remote HFP server by issuing the ServiceDiscovery 3
11, command to get the port number.Note: The port ID on the remote Hands free device is 0x02 (The Unsigned int), from the Attribute ID 0x0004. This port ID is used in the following OpenAudioGatewayClient command as its second parameter after being converted to its decimal equivilant (10).
AG>ServiceDiscovery Usage: SERVICEDISCOVERY [Inquiry Index] [Profile Index] [16/32 bit UUID (Manual only)]. Profile Index: 0) Manual (MUST specify 16/32 bit UUID) 1) L2CAP 2) Advanced Audio 3) A/V Remote Control 4) Basic Imaging 5) Basic Printing 6) Dial-up Networking 7) FAX 8) File Transfer 9) Hard Copy Cable Repl. 10) Health Device 11) Headset 12) Audio gateway 13) HID 14) LAN Access 15) Message Access 16) Object Push 17) Personal Area Network 18) Phonebook Access 19) SIM Access 20) Serial Port 21) IrSYNC Function Error. AG>ServiceDiscovery 3 11 SDP_Service_Search_Attribute_Request(Headset) Success. AG> SDP Service Search Attribute Response Received (Size = 0x0010) Service Record: 1: Attribute ID 0x0000 Type: Unsigned Int = 0x00010001 Attribute ID 0x0001 Type: Data Element Sequence Type: UUID_16 = 0x1108 Type: UUID_16 = 0x1203 Attribute ID 0x0004 Type: Data Element Sequence Type: Data Element Sequence Type: UUID_16 = 0x0100 Type: Data Element Sequence Type: UUID_16 = 0x0003 Type: Unsigned Int = 0x02 Attribute ID 0x0006 Type: Data Element Sequence Type: Unsigned Int = 0x656E Type: Unsigned Int = 0x006A Type: Unsigned Int = 0x0100 Attribute ID 0x0009 Type: Data Element Sequence Type: Data Element Sequence Type: UUID_16 = 0x1108 Type: Unsigned Int = 0x0100 Attribute ID 0x0100 Type: Text String = Headset Attribute ID 0x0302 Type: Boolean = TRUE - After we found the device we need to issue the OpenClient command to open
the Client
port.
AG>OpenClient Usage: Open [Inquiry Index] [RFCOMM Server Port]. Function Error. AG>OpenClient 3 2 HDSET_Open_Remote_Headset_Port() was successful. - You should receive an HDSET Open Remote Headset Port indication on the
Client
console:
AG> atPINCodeRequest: 0x000DFD4072EF Respond with the command: PINCodeResponse AG>PINCodeResponse 0000 GAP_Authentication_Response(), Pin Code Response Success. AG> atLinkKeyCreation: 0x000DFD4072EF Link Key: 0x19CDEF146AF8A709A1C93BAA99A6E8EE Link Key Stored locally. AG> HDSET Open Port Confirmation, HDSETID: 0x0001, Status 0x0000. AG> HDSET Speaker Gain Indication, ID: 0x0001, Gain: 0x0005. AG> HDSET Microphone Gain Indication, ID: 0x0001, Gain: 0x000A. - You must now ring the Server device in order to begin the audio streaming
process. This can be accomplished by issuing the RingIndication command
on the
Client.
AG>RingIndication HDSET_Ring_Indication() Success. - Next we will attempt to setup and release the audio connection on the current
port.
AG>ManageAudio
Usage: Audio [Release = 0, Setup = 1].
Function Error.

AG>ManageAudio 1
HDSET_Setup_Audio_Connection: Function Successful.

AG>
HDSET Audio Connection Indication, ID: 0x0001.


AG>ManageAudio 0
HDSET_Release_Audio_Connection: Function Successful.

AG>RingIndication
HDSET_Ring_Indication() Success.